Getting started
Four things stand between a fresh install and a working shop, or five if you place the basket yourself. The plugin tracks them for you on its Start here tab, and measures each one from what is actually true rather than from what you have ticked off.
Install Bang! Cart from the WordPress plugin directory and activate it. Its full listing name is Bang! Cart - Standalone Stripe Shopping Cart & Buy Buttons, and searching for Bang! Cart in Plugins > Add New finds it. A Bang! Cart item appears near the top of your admin menu, just below Dashboard, and a fresh install opens on the Start here tab.
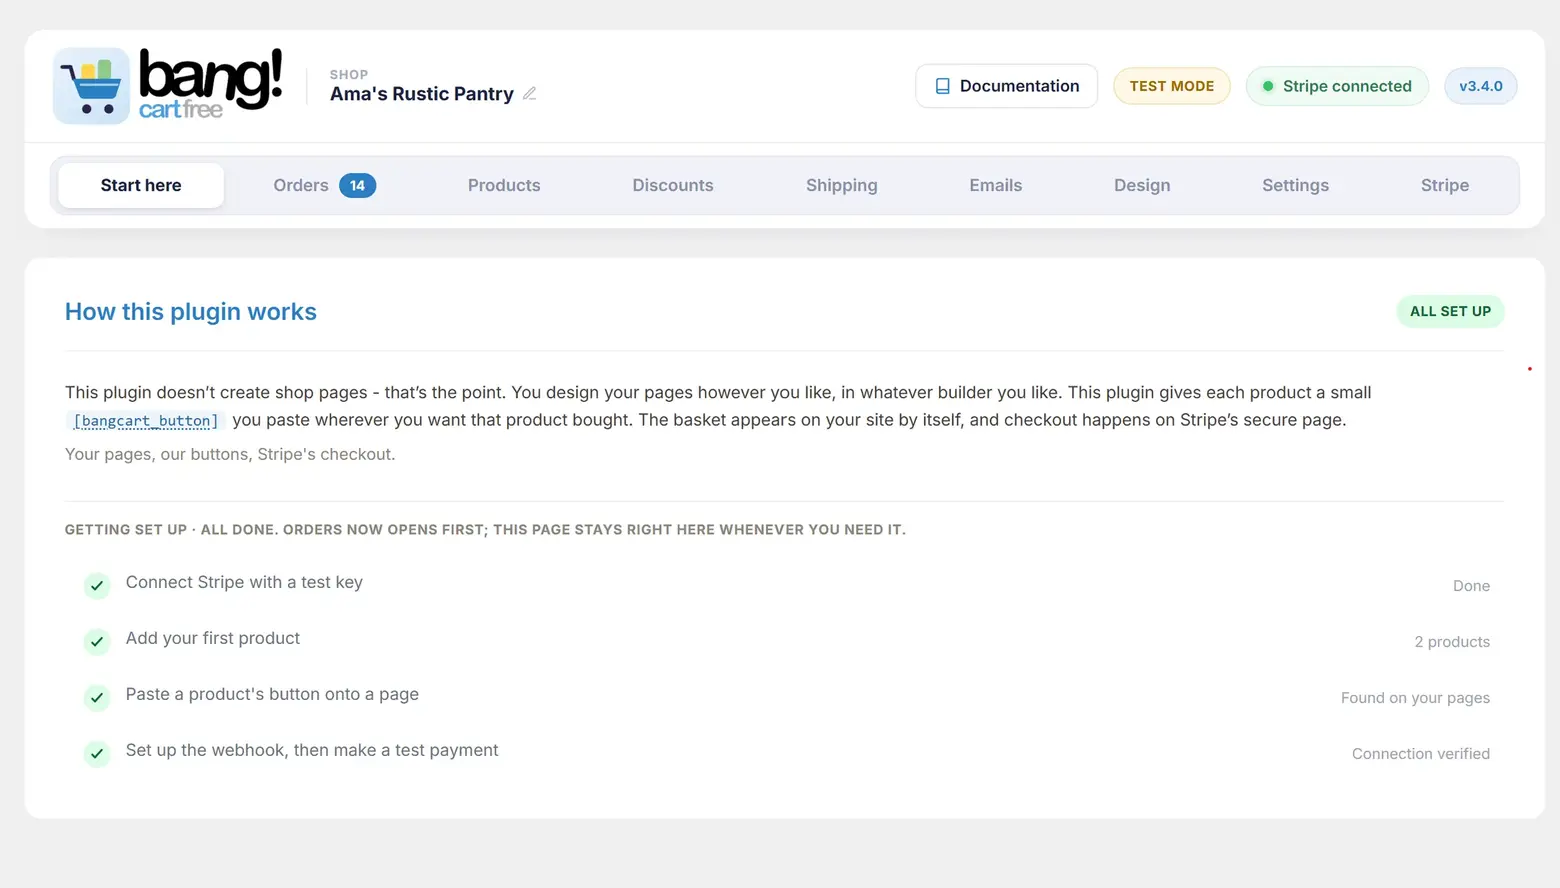
What this plugin is, before you start
Bang! Cart does not create shop pages. That is the whole point of it, and it is the one thing worth understanding before you touch a setting, because it is the opposite of what a store plugin normally does.
You design your pages however you like, in whatever builder you like. The plugin gives each product a small shortcode you paste exactly where you want that product bought. The basket appears on your site by itself, and payment happens on Stripe's own secure page.
Your pages, our buttons, Stripe's payment form. If you have arrived from a plugin that generates a shop for you, this will feel like a missing feature for about ten minutes, and then like the reason you switched.
The Start here checklist
The checklist has four steps, or five if you choose to place the basket yourself. Only the step you are on is expanded; finished steps collapse to a single line. Nothing here is a tick box you mark yourself: until the checklist is complete, every step is re-measured from real state each time the page loads, so it cannot tell you something is done when it is not.
Completion is a one-way door. The moment the checklist goes green, or a paid order proves the setup end to end, the plugin records that it is done and stops re-scanning your pages. There is nothing left to prove, and a scan that runs forever is a cost for no benefit. Clear test order data on the Stripe tab removes that record, so a development shop goes back to the beginning while a live shop's real order re-completes it at once.
- Connect Stripe with a test key. Paste your test secret key on the Stripe tab. Test mode behaves exactly like live mode, so you can run the whole thing end to end before any real money moves. See Connecting Stripe.
- Add your first product. Either create it in Stripe and press Sync from Stripe on the Products tab, or add it on the Products tab directly. You can mix both freely. See Products and stock.
- Paste a product's button onto a page. Every product carries a Copy button shortcode control. Paste what it gives you into the page where you want that product bought. See Shortcode reference.
- Set up the webhook, then make a test payment. One button creates the webhook in your Stripe account. Without it, payments succeed but no emails are sent and stock never moves. See The webhook.
A fifth step appears only if you have set the basket to I'll place it myself on the Design tab. It asks you to place the basket trigger, and it gates completion, because a shop whose basket cannot be opened is not set up.
If the checklist cannot see your button, that is not a failure. It looks in published page content and in Elementor's stored data, which covers most sites but not every one. It says "We couldn't spot one on your pages yet" rather than accusing you. A completed test payment marks setup done regardless, because a real order is better evidence than any page scan.
Where the front door goes next
Once the checklist is green, or once a paid order exists, the plugin's default tab moves from Start here to Orders. Start here stays in the tab row permanently. "How do I put a product on a page" is a month-three question as often as a day-one one.
What it deliberately does not do
These are decisions, not gaps, and each one is a point at which a growing shop should consider a full store platform instead.
- No tax tables. A VAT-registered shop needs Stripe Tax, which this plugin does not wire up.
- No weight-based postage and no per-product shipping classes.
- No subscriptions and no digital downloads.
- No customer accounts and no order history page for your buyers. Buyers get a status link instead.
- No copy of your orders. Stripe already has them, and one truth beats two.
It also creates no custom database tables. Every setting lives in WordPress options, which is why uninstalling leaves nothing behind.
Next
Work through the checklist in order. Connecting Stripe is step one, and it takes about two minutes.
Still stuck?
Write to me and it is me who answers, not a ticket queue. Tell me what you expected and what happened instead.